Table of Contents
Whatsminer M50 Specifications
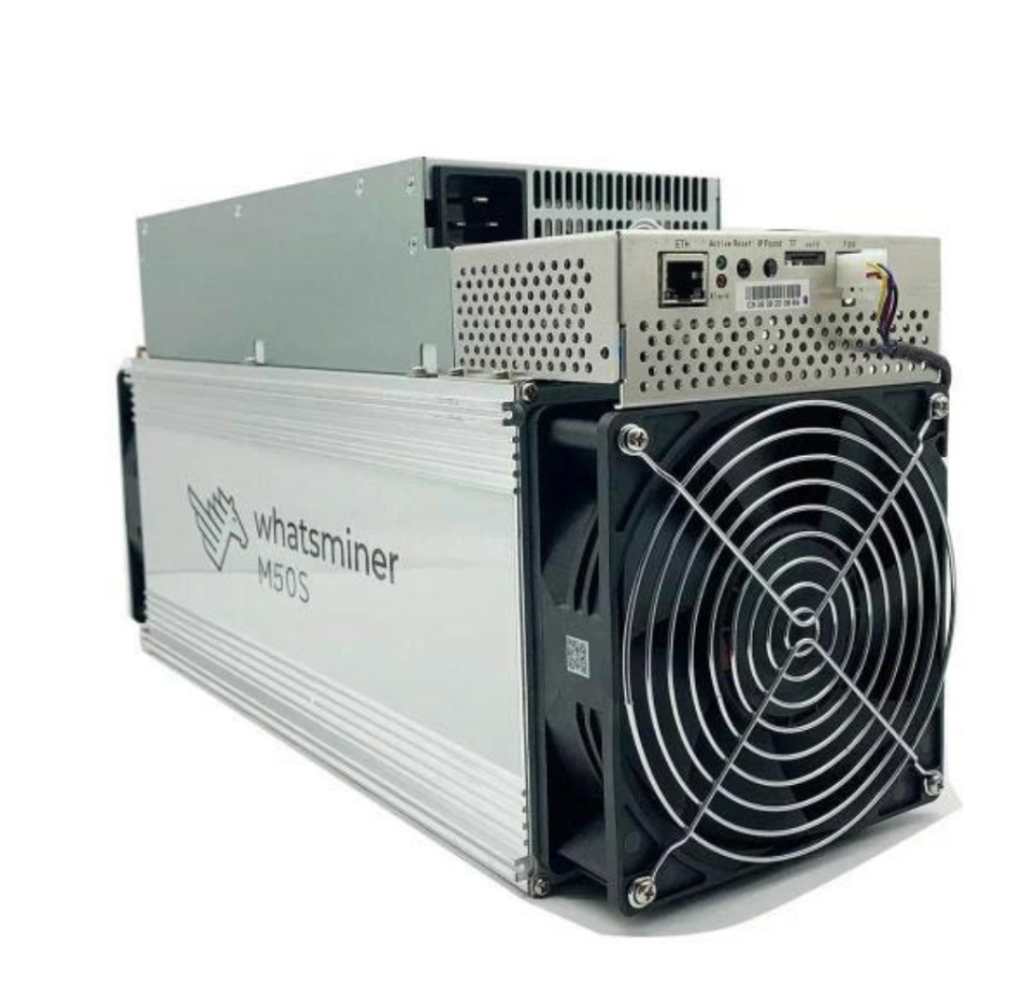
The Whatsminer M50 is a high-performance ASIC miner launched in July 2022, optimized for the SHA-256 algorithm used in Bitcoin mining. It features a hash rate ranging from 110 Th/s to 122 Th/s with a power consumption of approximately 3306W and an efficiency rating of 29 J/TH. Built on a 5nm chip process, this air-cooled unit is specifically designed for enterprise-level mining operations.
These units are highly regarded in the industry for their reliability and repairable hashboard design. Additionally, the M50 features a more compact form factor compared to many Antminer models, allowing for higher density in mining racks.
Whatsminer M50 Composition
The internal architecture of the M50 consists of the following primary components:
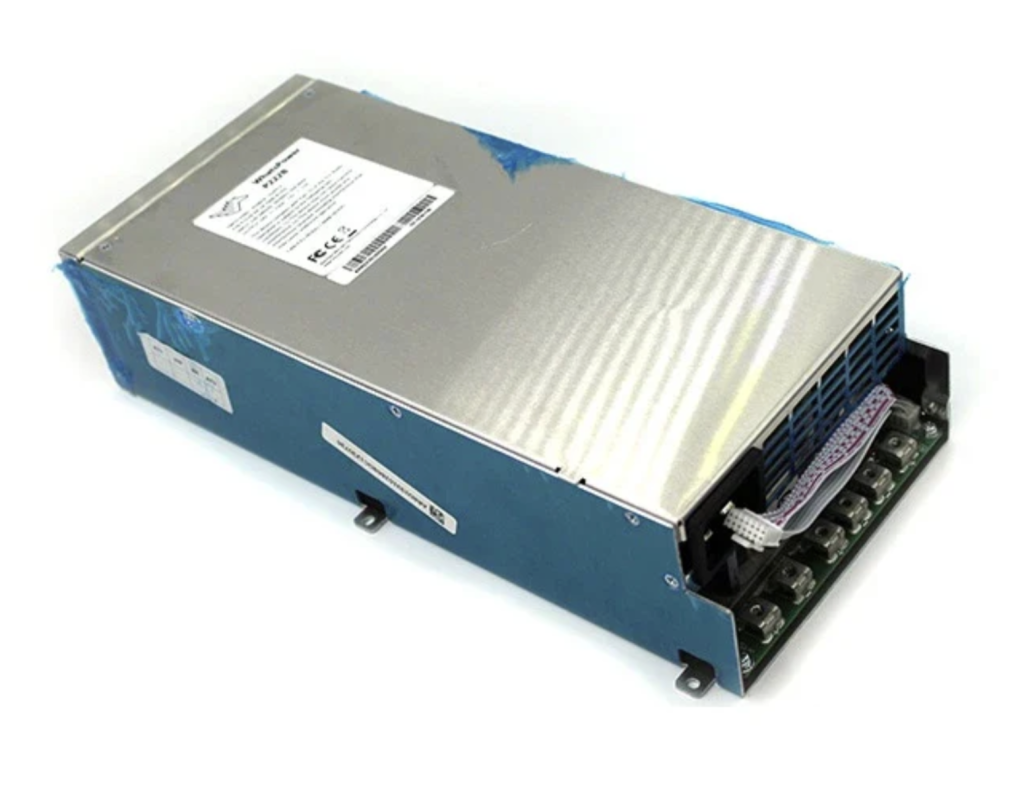
- Power Supply Unit (PSU): Typically models P221B or P222B.
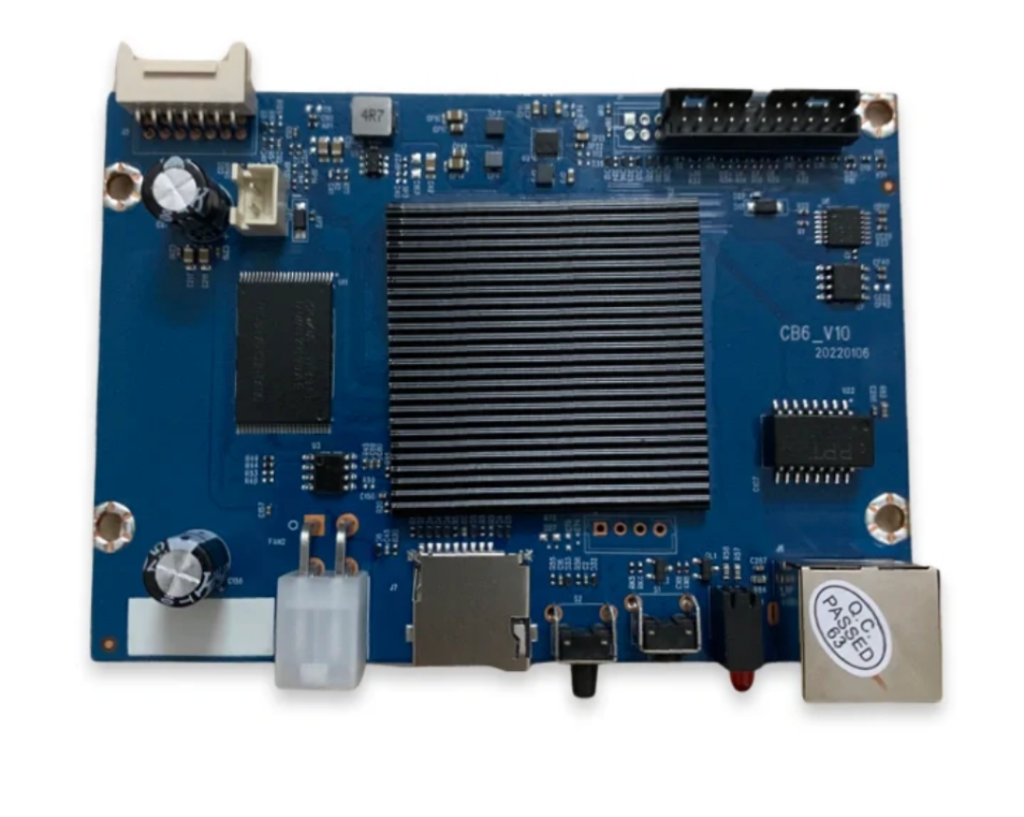
- Control Board and Adapter Bridge.
- Cooling System: Two high-RPM fans (intake and exhaust).
- Hashboards: Three individual boards per unit.
It is important to note that the M30 control board is not compatible with the M50 control board. Before attempting a replacement, always check the label sticker on the top of the control board to ensure the model matches exactly.
Using the Whatsminer Tool
The Whatsminer M50 is managed through the official Whatsminer Tool, which is available for download on the manufacturer’s website. This utility is essential for monitoring the miner’s IP address, MAC address, hash rate, and error codes.
To set up the tool:
- Open the “IP Range” menu.
- Define the IP address range of your network switch.
- Press the “Scan” button to populate the list of active miners.
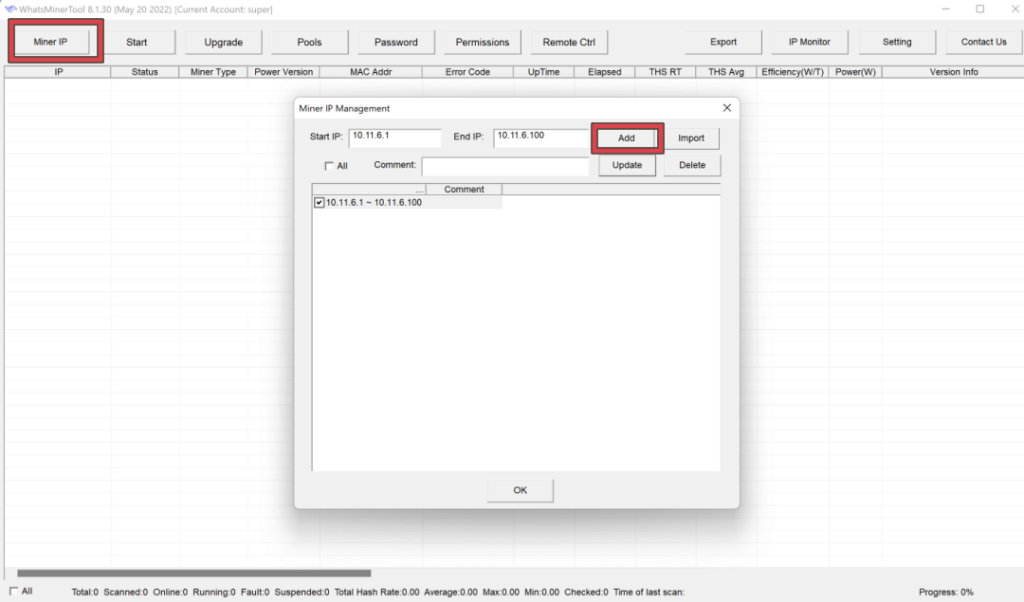
If a miner fails to operate, the tool will generate an error code providing insight into the specific hardware or software failure. For a detailed breakdown of what each code means, you can refer to the [Error Code Reference Guide on this website].
Identifying and Replacing the Whatsminer M50 PSU
If your miner logs show error codes 201, 202, 240, or 241, your diagnosis likely points to a faulty Power Supply Unit (PSU). These specific codes often indicate voltage abnormalities, power loss, or communication failures between the PSU and the control board.
When replacing the unit, you must ensure you have the exact match for your hardware. For the Whatsminer M50, the standard PSU model is the P221B (12V).
Why Compatibility Matters
While many Whatsminer PSUs look identical from the outside, the internal voltage specs and pin configurations vary significantly between different generations. Installing an incompatible PSU—even if it physically fits—can lead to underperformance or permanent hardware damage to your hashboards.
Whatsminer PSU Compatibility Table
To help you find the right part for your specific machine, refer to the compatibility chart below before ordering a replacement:
| Miner Model | PSU Model | Voltage Output |
| M50 / M50S | P221B | 12V |
| M30S / M30S+ | P21D / P221C/222C | 12V / 14V |
| M20S / M21S | P21 | 12V |
| M60 / M60S | P222B | 12V |
How to Open Whatsminer M50 & Remove Hashboards Safely
If you have identified a faulty hashboard through log analysis or cross-testing, the next step is physical removal for repair or consolidation. This disassembly process is nearly identical for most air-cooled Whatsminer models, including the M30, M50, and M60 series. Following a proper sequence is essential to avoid damaging the sensitive control board or ribbon cables.
Step-by-Step Disassembly Guide
- Remove the Top Cover: Unscrew the four screws on the top lid (the enclosure protecting the control board).
- Disconnect the Data Bridge: Carefully detach the green ribbon cable that connects the control board to the communication bridge. Be gentle, as these connectors can be brittle.
- Remove the Front Fan: Unscrew the front intake fan to gain clear access to the internal slots.
- Disconnect from PSU: Unscrew the two bolts connecting the hashboard terminals to the PSU busbars.
- Slide Out the Hashboard: Once all screws and cables are cleared, carefully slide the hashboard out from the chassis.
Why Regular Disassembly Matters
Removing the hashboard isn’t just for repairs. To ensure a longer lifespan for your miner, it is highly recommended to take the boards out periodically for a deep clean. Over time, dust and debris block the airflow between the heatsink fins, leading to higher operating temperatures and premature chip failure. Keeping the airflow path clear is the best way to maintain peak efficiency.
Hashboard Repair
Hashboard repair is a highly technical process that requires specialized equipment. If you do not have professional experience, it is strongly recommended that you send the board to a qualified repair shop rather than attempting a DIY fix. A proper repair setup requires a dedicated hashboard tester, Power supply, a professional soldering station, specific flux, and various precision tools.
Repair costs generally scale with the severity of the damage. Minor issues typically cost around $100, while more complex failures can reach $200. It is best to contact a repair center directly for a precise quote before shipping your hardware.
Hashboard Testing and Chip Identification
There are several specialized testers available for the M50, including Stasic, Arc, and various control board-based testers. These tools allow you to run diagnostics and identify specific problem chips or domains.
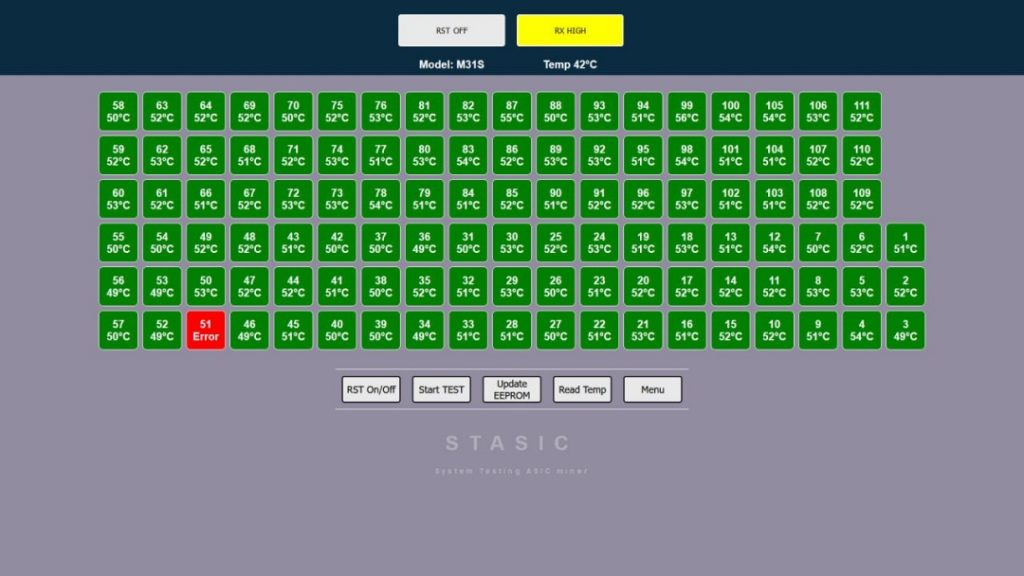
However, a common issue occurs where the tester returns a “0 chips” found result. In this scenario, the software cannot identify the faulty component. To troubleshoot this, you must manually check the voltage at the five specific test spots on the board to locate the break in the circuit.
There are two primary hashboard variants for the M50: one with 111 chips and another with 105 chips. You can identify which board you have by examining the holes in the heatsink:
- 111-chip hashboards feature either 5 or 7 holes in the heatsink.
- 105-chip hashboards feature 6 holes in the heatsink.
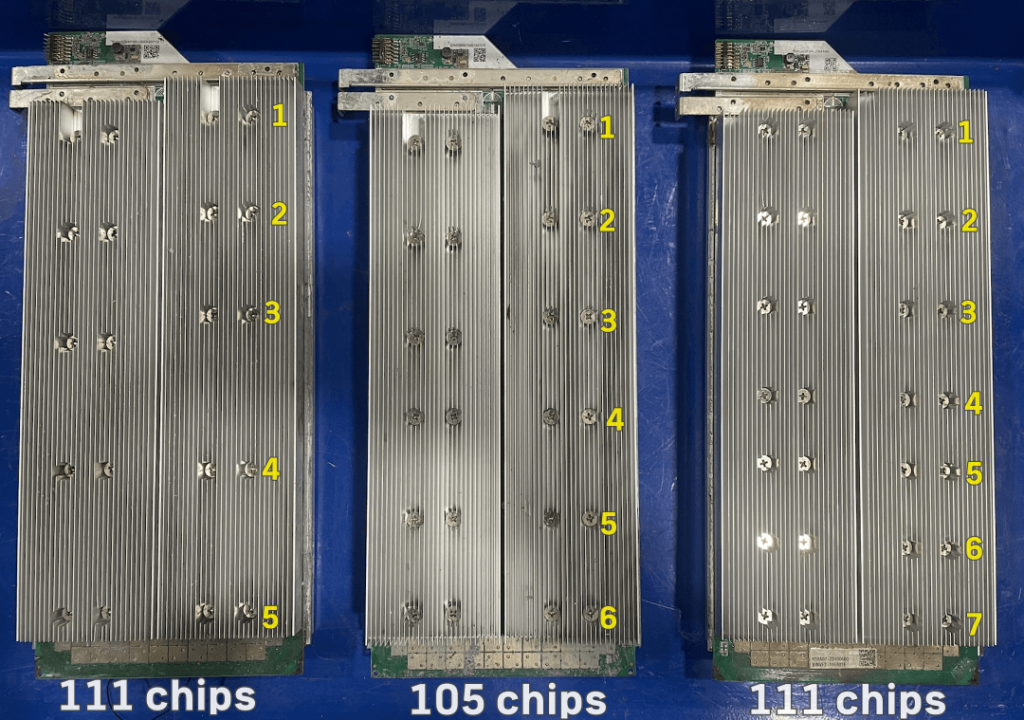
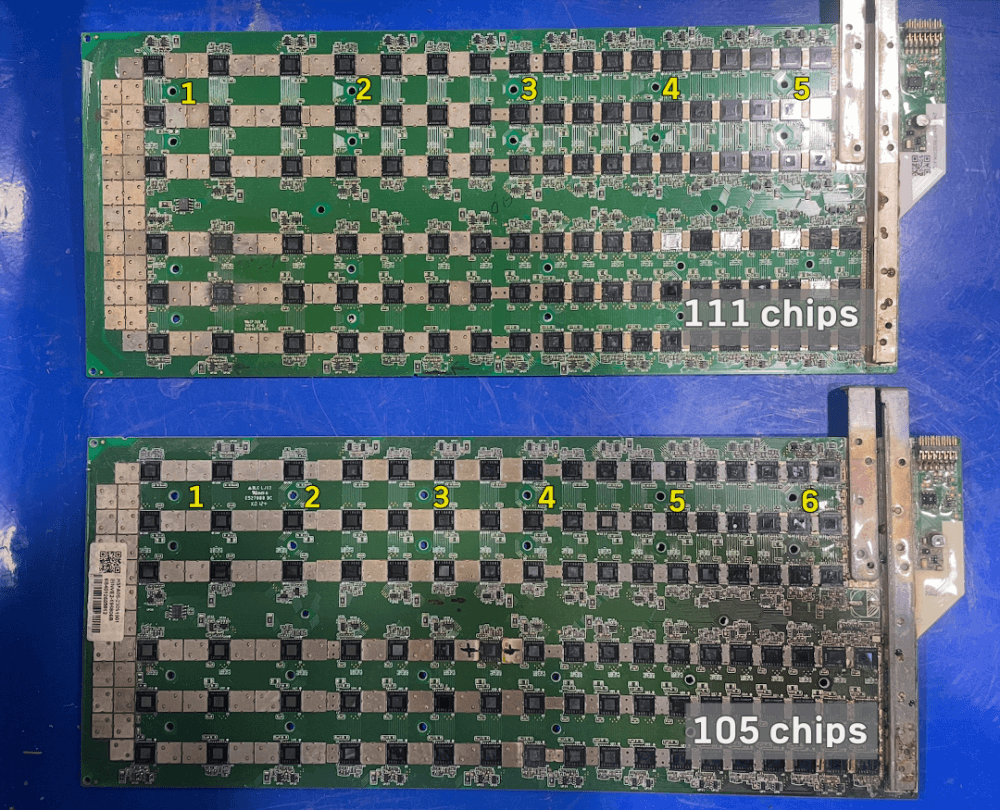
Understanding these physical differences is crucial when ordering replacement parts or performing component-level diagnostics.
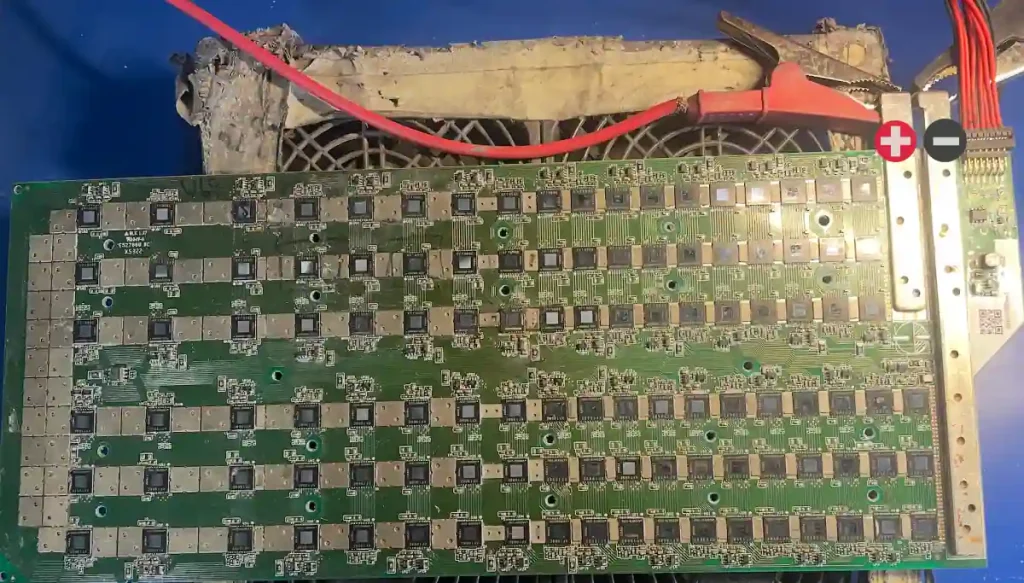
Wiring Up the Hashboard: Getting the Polarity Right
When you’re ready to power on the M50 hashboard for testing, you need to be extremely careful with the copper busbars. Looking at the board from the terminal side, you’ll notice two distinct copper bars:
- The Left Bar (Short): This is your Positive ($+$) terminal.
- The Right Bar (Long): This is your Negative ($-$) terminal.
Whatsminer M50 Hashboard: 5 Essential Voltage Test Points
If your Whatsminer M50 hashboard isn’t hashing or shows “find 0 asic” error, the first step is a physical health check. You can diagnose most board issues by measuring the 5 crucial voltage signals.
A Note on Safety
Before you grab your multimeter, remember: Hashboard repair is delicate work. If you don’t have experience with micro-soldering or ASIC diagnostics, one slip of the probe can short out the entire board.
A professional repair for a Whatsminer hashboard typically costs between $90 and $200. Given the value of an M50, it is often better to send your board to a pro rather than risking a total loss.
The 5 Signal Test Spots
If you are experienced and ready to troubleshoot, these are the standard voltage readings you should look for.
Tip: Ensure your board is powered correctly (Left/Short bar is Positive +) and your tester is active before taking these readings.
| Signal Point | Expected Voltage |
| RST (Reset) | 1.8V |
| RXD (Receive) | 1.8V |
| CS / CISI | 0V |
| TXD (Transmit) | 1.8V |
| CLK (Clock) | 0.8V – 0.9V |
Troubleshooting LDO Voltages: The Power Behind the Signals
Once you’ve checked your 5 main test spots, you might find that the voltages are sitting too low (for example, seeing 0.8V instead of 1.8V). When this happens, the problem is usually further upstream at the LDO (Low Dropout Regulator).
How LDOs Work on the M50
On a Whatsminer M50 hashboard, each domain relies on two LDOs to power the three ASIC chips within that group. These components are responsible for converting the board’s power into the specific, stable voltages the chips need to communicate:
- LDO 1: Outputs 1.8V
- LDO 2: Outputs 0.8V
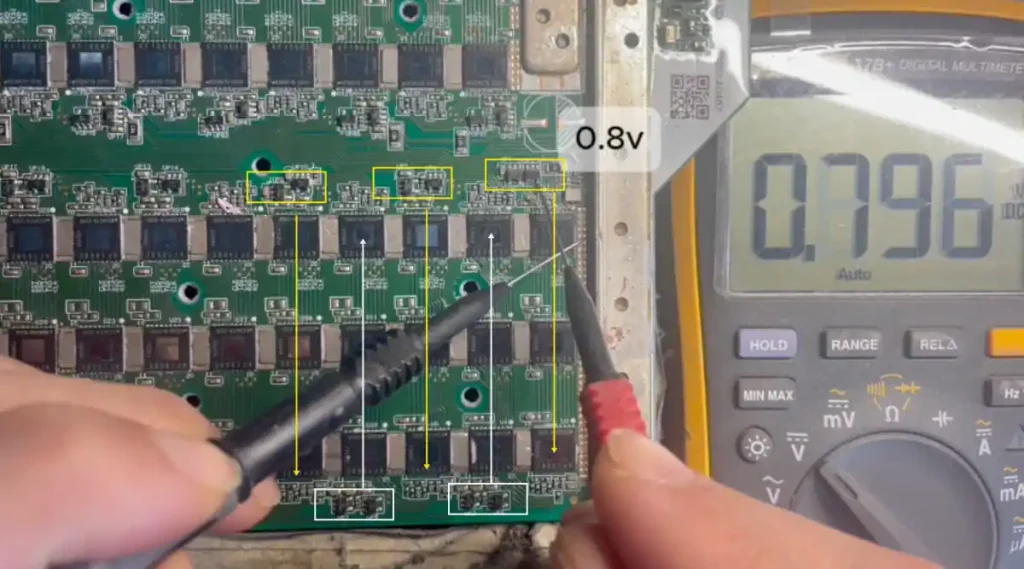
Why LDO Failure is a “Chain Killer”
The LDOs are the foundation. If an LDO is faulty or failing, it won’t be able to maintain a steady output. This causes a “ripple effect” where your 5 main test spots (RST, TXD, etc.) show low or unstable voltage.
If you are getting a “Missing Chips” error on your tester, don’t just assume the ASIC is dead. Always check the LDOs first. If the LDO isn’t providing a clean 1.8V or 0.8V to the domain, the chips won’t wake up, no matter how many times you try to reset the board.